How I moved this site from Wordpress to self-hosted hugo
Note : I recently moved my Wordpress website to a self-hosted Hugo WebSite - This Post relates the steps I took to achieve this and describes the current architecture; it talks about Hugo, GitLab CI/CD, VMs, docker; I’ll have follow-up post regarding the monitoring solution I deployed for this (Prometheus, Grafana, Raspberry Pi…)
The project is still ongoing so this post will be updated along the way - I’ll push the updates regularly and it may include some typos, errors (technical or English error) so please be indulgent
Table of Contents
The reasons
First of all, let’s talk about the reasons why I decided to move my website solarpace.io from a Wordpress Hosted solution to a self-hosted Hugo:
- the Wordpress website was working fine but it was a bit overkill for what the website became; it started as a frontend for my Solution Architect self-employed career but today is only a Blog website and most of the plugins, settings, pages were no longer needed. I wanted something very simple so I can create/update my blog posts very easily using Markdown as I am using it almost daily and I find it very powerful. The docs part of this website is also powered by Markdown with Antora, a documentation site generator.
- I recently changed my Internet provider from Orange to Free with their Internet router Freebox Delta which also provides some nice features like NAS and VMs : I wanted to take advantage of this feature to host my website. So I first upgraded this router with 4 SSD disks mounted in RAID10 to give me 1TB usable disk capacity and 16GB RAM instead of the default 2GB RAM provided.
- Docker : I’ve been using Docker for a few years now, at work and for lab experiments, and I wanted to reuse this knowledge and deploy a website but also all the monitoring solution behind; this blog website being only the beginning and I have plenty of ideas.
- For fun and hands-on training : this was maybe the first reason I chose to change my Internet provider, having more capabilities with a small budget and play with it.
The project
After some quick researches I found out that moving from Wordpress to a Markdown solution was quite easy; there are lots of Wordpress plugins, converters which automates that for you. Next step was to decide on a static Website solution; having already used Hugo a few years ago for a pet project, I discovered the product has evolved quite a lot since then and would be the best candidate for me. I also wanted to automate all the build/deploy process using the experience I already had with GitLab (repository, CI/CD, registry) and docker swarm.
I will also describe the architecture I put in place using the Freebox VMs (my Internet provider having a box which allow VMs creation)
The Migration
I first installed Hugo locally and after some researches I chose the theme Mainroad
Exporting my Wordpress content and reformatting it for Hugo was quite easy. Using the plugin Wordpress-To-Hugo-Exporter it took me less than 30 mn to export, convert and fix the small issues I discovered. It was not perfect and I am quite sure I could review and improve the .md files so they benefit of all Hugo features but it was ready to be released online. I installed Hugo locally with the theme Mainroad
With that my new website was ready, almost similar to the old one; I was ready to start implementing the CI/CD process so I can automate all the release process. I’ve been using GitLab for years now and I am impressed with all the new features they added along the years, especially the CI/CD process. So I created my blog-hugo repository and started working on the build/release process which involves 3 steps:
The docker image
To build the Docker image running the Blog Website : I created a Dockerfile with a multi-stages build process :
- using a alpine image I install Hugo, get my Hugo source files and build the website:
FROM alpine:3.9

ENV HUGO_VERSION=0.82.0 \
    HUGO_SITE=/srv/hugo

RUN apk --no-cache add \
    curl \
    git \
    && curl -SL https://github.com/gohugoio/hugo/releases/download/v${HUGO_VERSION}/hugo_${HUGO_VERSION}_Linux-64bit.tar.gz \
    -o /tmp/hugo.tar.gz \
    && tar -xzf /tmp/hugo.tar.gz -C /tmp \
    && mv /tmp/hugo /usr/local/bin/ \
    && apk del curl \
    && mkdir -p ${HUGO_SITE} \
    && rm -rf /tmp/*

WORKDIR ${HUGO_SITE}

COPY . ${HUGO_SITE}

RUN hugo
- stage 2, run Minify to reduce the files sizes (I later had to disable the html minify as I encountered some issue after introducing some Hugo shortcodes - I’ll investigate and fix when I can)
# Stage 2 : Minify Website
FROM tdewolff/minify:latest

COPY --from=0 /srv/hugo/public /srv/hugo/public
WORKDIR /srv/hugo/public

RUN minify --recursive --verbose \
        --match=\.*.js$ \
        --type=js \
        --output ./ \
        .

RUN minify --recursive --verbose \
        --match=\.*.css$ \
        --type=css \
        --output ./ \
        .

RUN minify --recursive --verbose \
        --match=\.*.html$ \
        --type=html \
        --output ./ \
        .
- finally, using a nginx image, I push the end result and get my blog-hugo docker image ready for deployment
  # Stage 2: Copy compiled static website into an nginx Docker image
  FROM nginx:latest

  COPY --from=1 /srv/hugo/public /usr/share/nginx/html

  CMD ["nginx", "-g", "daemon off;"]
The GitLab CI/CD
Publishing Process
GitLab describes all the CI/CD process in a .gitab-ci.yml file. I wanted my process to automatically:
- build the docker image using the Dockerfile
- push the image to the GiLab Container registry
- for the main branch, deploy the image on the production docker server and replace the previous one
I’ve already done that already for other projects so I thought it would be easy but I discovered a few challenges:
- the VMs running on my Freebox server are arm64 VMs so I had to build a Docker image for this platform. (for the monitoring images I also had to find the images for arm-64 or build my owns). Hopefully I discovered buildx and was able to use it in my CI/CD process:
variables:
  TEST_IMAGE: ${CI_REGISTRY_IMAGE}/website:$CI_COMMIT_SHORT_SHA
  RELEASE_IMAGE: ${CI_REGISTRY_IMAGE}/website:latest
  BUILDX_VERSION: "v0.4.1"

before_script:
  - docker login -u gitlab-ci-token -p $CI_BUILD_TOKEN $CI_REGISTRY
  - apk add curl
  - mkdir -vp ~/.docker/cli-plugins/ ~/dockercache
  - curl --silent -L "https://github.com/docker/buildx/releases/download/${BUILDX_VERSION}/buildx-${BUILDX_VERSION}.linux-amd64" > ~/.docker/cli-plugins/docker-buildx
  - chmod a+x ~/.docker/cli-plugins/docker-buildx
  - docker run --rm --privileged multiarch/qemu-user-static --reset -p yes

build:
  stage: build
  script:
    - docker buildx create --use
    - docker buildx inspect --bootstrap
    - docker buildx build --push --platform linux/arm64 -t $TEST_IMAGE .
- for automating the image deployment, I first used WatchTower; it was working well until I switched to docker swarm. I then deployed Portainer to manage my Docker swarm and started configuring the webhook option to automatically trigger the refresh at the end of the CI/CD. I haven’t tested yet as I didn’t want to open the Portainer application externally - I still need to think of the best way to manage this part.
Note: for the Documentation website, the process is almost the same ; I just have a Dockerfile with the Antora build and the .gitlab-ci.yml is almost the same.
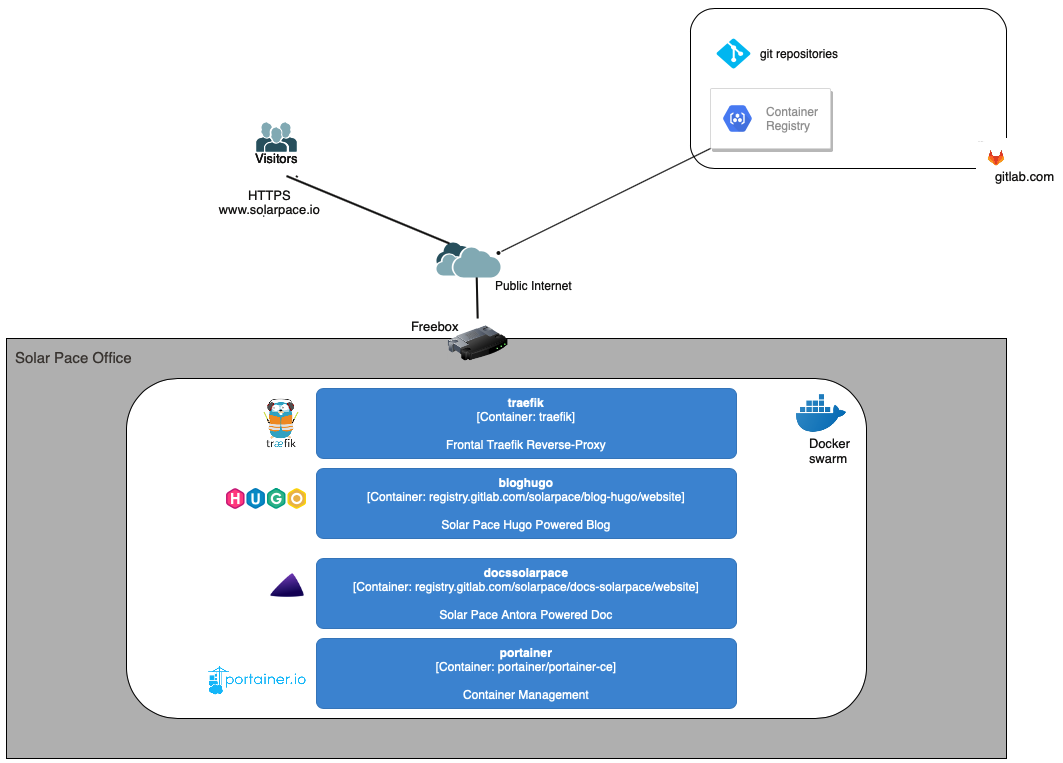
The Architecture
ToDo
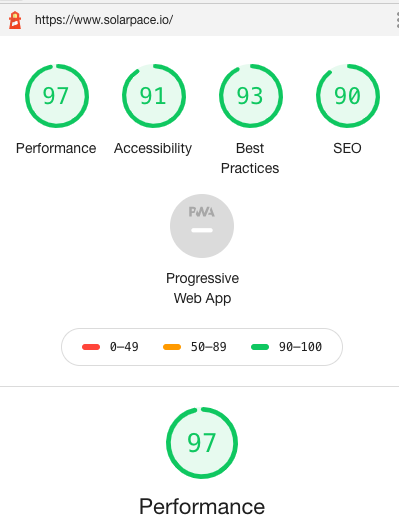
Lighthouse results
I was quite impressed with the first tests I got from Lighthouse: they are really good, with just a standard configuration of Hugo and the theme Mainroad: