
Running my Resume Application with OCI Container Instance

Introduction
I wrote a post last year about the Serverless resume on Oracle Cloud Infrastructure; this was deployed using:
- Autonomous Json Database (Free Tier) => to store my resume data as Json data in Collections
- Object Storage bucket (Free Tier) => to store my website built with React
- Oracle Cloud Functions (Free Tier for the first 2 million/Month ) => to retrieve the data using SODA Rest services
- API Gateway (2,5596 € for 1 Million API Calls/Month) => to expose my Function
This month, we got a new cool service on OCI: OCI Container Instances; so I decided to revisit this Resume application by using this new service.
Therefore I moved away from Serverless Application and switched to Serverless compute for my React application; I also took this opportunity to work with Remix, a new SSG (Server-Side Rendering) React Framework; this gave me the opportunity to get rid of the Functions as the Database REST requests would be managed directly by Remix on the Server Side of my application. So, today, my Resume Application only uses those OCI Services.
- Autonomous Json Database (Free Tier) => to store my resume data as Json data in Collections and expose them using REST services
- Container Registry (Free Tier) => Oracle-managed Docker registry service for storing my container image
- Container Instances (OCPU and Memory) => to run the Remix Application inside a Container
- Flexible Load-Balancer (Free Tier) => to expose my application, secured with OCI Certificates
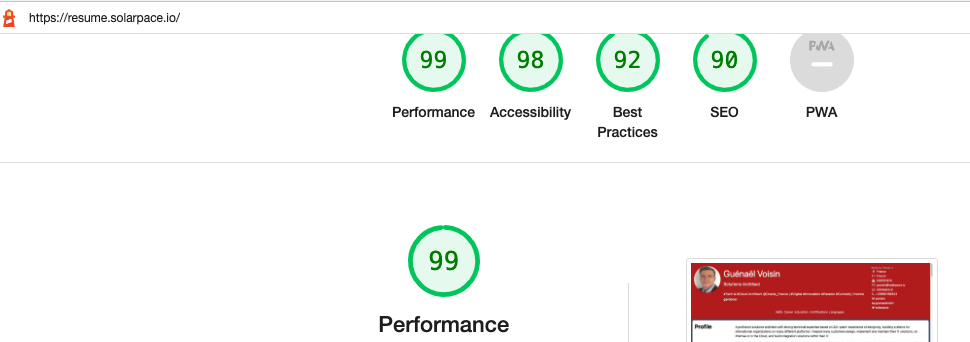
🚄 The Lightouse results are much better now:
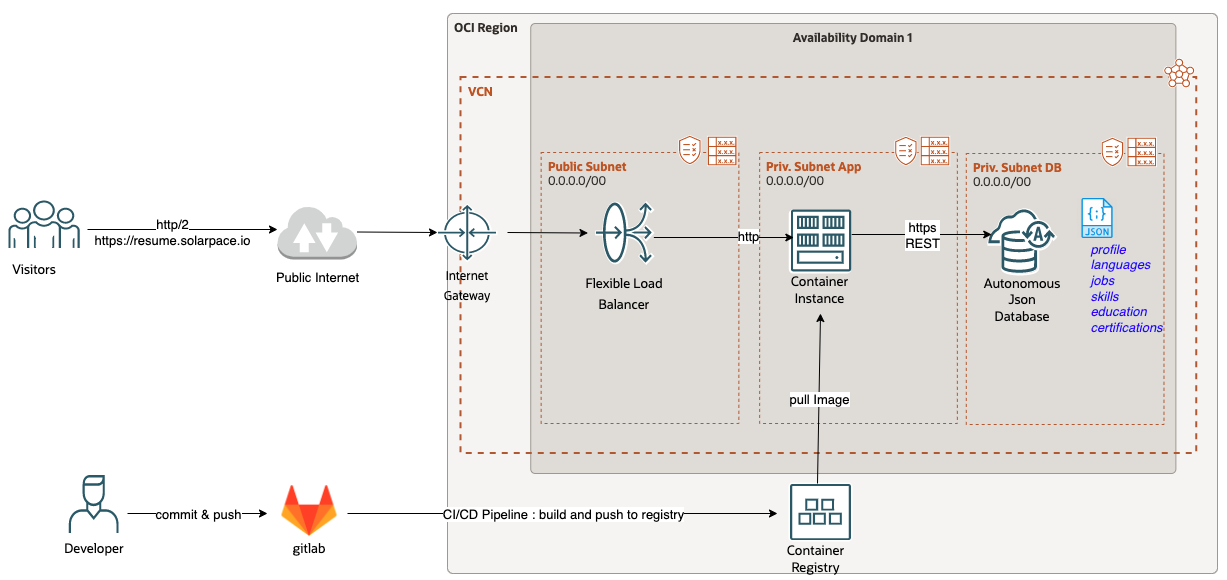
Revised Architecture
Here are the different components of the OCI architecture:
OCI Setup
Autonomous Database
I used the Free-Tiers Autonomous JSON Database, unchanged from my previous project. Check out the README.md file describing all the steps to provision your Autonomous Json Database, import your collections data and deploy your function.
Container Registry
I created the resume/my-oci-resume repository in OCI:
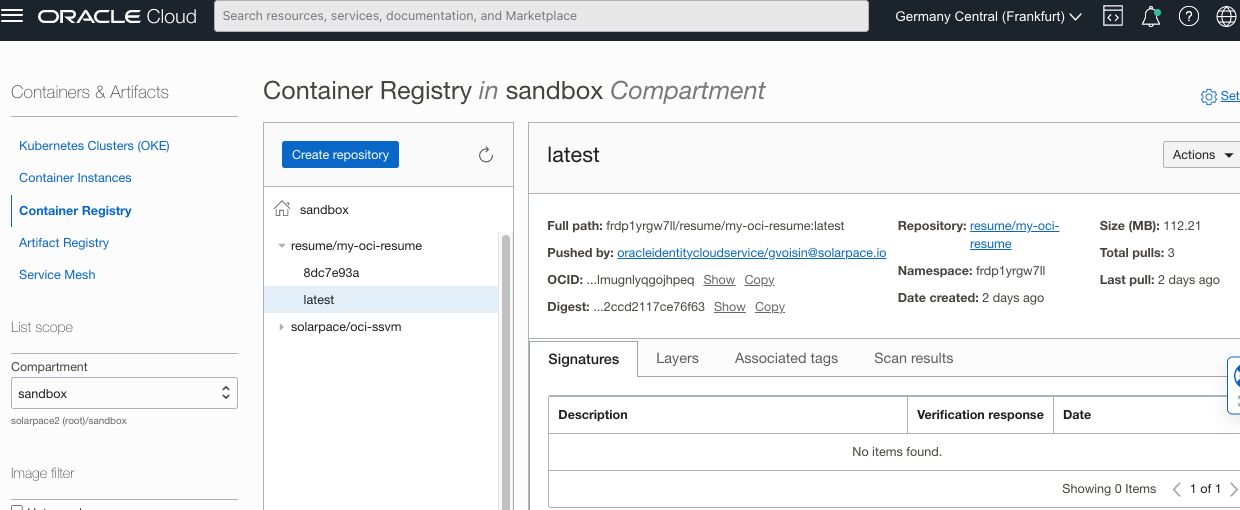
You can do it manually from the OCI console: see Creating a Repository
Or you can use the oci-cli; you only need to get your compartment OCID:
oci artifacts container repository create --display-name resume/my-oci-resume --compartment-id ocid1.compartment.oc1..aaaaaaaxxxxxxxxxx --profile SOLARPACE
Container Instance
I won’t go into the details for this part; there is an excellent Getting Started with OCI Container Instances Blog Post which gives you all you need to know for this.
If, like me, you prefer automation to manual tasks, I’ll give you 2 methods to create your Container Instance using the OCI API:
Option 1: create an OCI Container Instance with Postman:
Check out the official Postman OCI Workspace; from there you have all the information to get started quickly.
Once you configured the required variables for the authentication, you only need the target URL and the Body content for creating an OCI Container Instance:
- URL: https://compute-containers.eu-frankfurt-1.oci.oraclecloud.com/20210415/containerInstances
- change the region according to your setup
- Method: POST
- Json Body:
{
    "containers": [
        {
            "imageUrl": "fra.ocir.io/<my-oci-namespace>/resume/my-oci-resume:latest", // Your OCI Container Registry URL (could be an external Docker Registry)
            "displayName": "my-oci-resume",
            "environmentVariables": // Environment variables to setup the connection with the Autonomous DB
            {
                "OCI_SODA_URL": "https://<my-autonomous-url>/ords/resume/soda/latest/",
                "OCI_SODA_USERNAME": "<my-db-user>",
                "OCI_SODA_PASSWORD": "<my-db-password>",
                "SESSION_SECRET": "0ad3b5817cxxxx"
            },
            "definedTags": {},
            "freeformTags": {}
        }
    ],
    "compartmentId": "<my-oci-compartment-ocid",
    "availabilityDomain": "XXzx:EU-FRANKFURT-1-AD-1",
    "shape": "CI.Standard.E4.Flex", // The VM Shape you deploy; you don't need much here for this simple application
    "shapeConfig": {
        "ocpus": 1,
        "memoryInGBs": 2
    },

    "imagePullSecrets": [
        {
            // Your OCI username in base64 format; you can get it with this command: echo -n "value" | base64
            "username": "ZnxxxcDF5cmdxxxxxxxxxxx",
            // Your OCI Auth Token in base64 format; you can get it with this command: echo -n "value" | base64
            "password": "PxjkDJKJffdjkxxxxxxxxx=",
            // change the region code with your setup
            "registryEndpoint": "fra.ocir.io",
            "secretType": "BASIC"
        }
    ],
    "vnics": [
        {
            // The Private Subnet OCID where the Container Instance runs
            "subnetId": "ocid1.subnet.oc1.eu-frankfurt-1.aaaaaaxxxxxxx",
            "displayName": "solarpacepvtsub",
            "isPublicIpAssigned": false,
            "skipSourceDestCheck": true
        }
    ],
    "displayName": "my-oci-resume"
}
As a result, you should get the following API response (it took me some time to get it right …)
{
    "id": "ocid1.computecontainerinstance.oc1.eu-frankfurt-1.antheljxxxxxxxxxxxxxx",
    "displayName": "my-oci-resume",
    "compartmentId": "ocid1.compartment.oc1..aaaaaaaa6bohmlvxxxxxxxxxxxxxx",
    "availabilityDomain": "XXzx:EU-FRANKFURT-1-AD-1",
    "faultDomain": null,
    "lifecycleState": "CREATING",
    "lifecycleDetails": "Creating",
    "volumes": [],
    "volumeCount": 0,
    "containers": [
        {
            "containerId": "ocid1.computecontainer.oc1.eu-frankfurt-1.antheljtujuyqqaxxxxxxxxxxxxxxxxxx",
            "displayName": "my-oci-resume"
        }
    ],
    "containerCount": 1,
    "timeCreated": "2022-12-20T17:42:09.729Z",
    "timeUpdated": "2022-12-20T17:42:09.729Z",
    "shape": "CI.Standard.E4.Flex",
    "shapeConfig": {
        "ocpus": 1.0,
        "memoryInGBs": 2.0,
        "processorDescription": "2.25 GHz AMD EPYC™ 7J13 (Milan)",
        "networkingBandwidthInGbps": 1000.0
    },
    "vnics": [
        {
            "vnicId": null
        }
    ],
    "dnsConfig": null,
    "gracefulShutdownTimeoutInSeconds": 0,
    "imagePullSecrets": [
        {
            "secretType": "BASIC",
            "registryEndpoint": "fra.ocir.io"
        }
    ],
    "containerRestartPolicy": "ALWAYS",
    "streamId": "",
    "freeformTags": {},
    "definedTags": {},
    "systemTags": {}
}
Option 2: create an OCI Container Instance with oci-cli:
You will need the latest version (3.22.0 as of today).
Here is the syntax you need:
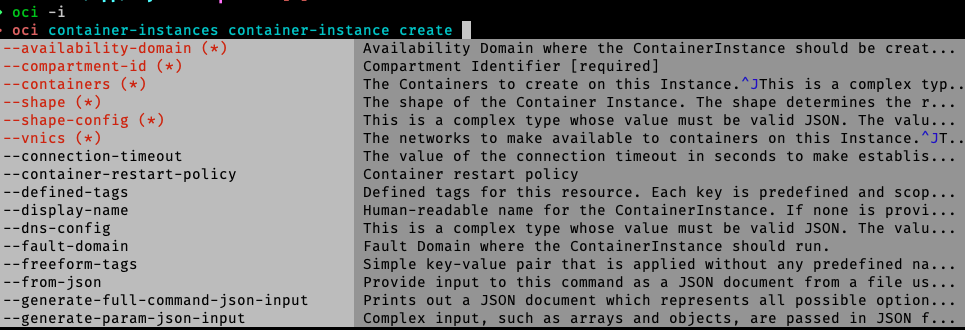
For example:
oci container-instances container-instance create --compartment-id ocid1.compartment.oc1..aaaaaaxxxxx --availability-domain XXzx:EU-FRANKFURT-1-AD-1 --containers file://containers.json --shape CI.Standard.E4.Flex --shape-config file://shape-config.json --vnics file://vnics.json --image-pull-secrets file://image-pull-secrets.json --display-name "my-oci-resume" --profile SOLARPACE
You will need the following files:
- containers.json
[
  {
      "imageUrl": "fra.ocir.io/frxxxxxxxxxx/resume/my-oci-resume:latest",
      "displayName": "my-oci-resume",
      "environmentVariables": {
          "OCI_SODA_URL": "https://<my-autonomous-url>/ords/resume/soda/latest/",
          "OCI_SODA_USERNAME": "<my-db-user>",
          "OCI_SODA_PASSWORD": "<my-db-password>",
          "SESSION_SECRET": "0ad3b5817cxxxx"
      },
      "definedTags": {},
      "freeformTags": {}
  }
]
- shape-config.json
{
  "memory_in_gbs": 2.0,
  "ocpus": 1.0
}
- vnics.json
[
  {
      "subnetId": "ocid1.subnet.oc1.eu-frankfurt-1.aaaaaaxxxxx",
      "displayName": "solarpacepvtsub",
      "isPublicIpAssigned": false,
      "skipSourceDestCheck": true
  }
]
- image-pull-secrets.json
[
  {
    // Your OCI username in base64 format; you can get it with this command: echo -n "value" | base64
    "username": "ZnxxxcDF5cmdxxxxxxxxxxx",
    // Your OCI Auth Token in base64 format; you can get it with this command: echo -n "value" | base64
    "password": "PxjkDJKJffdjkxxxxxxxxx=",
    // change the region code with your setup
    "registryEndpoint": "fra.ocir.io",
    "secretType": "BASIC"
  }
]
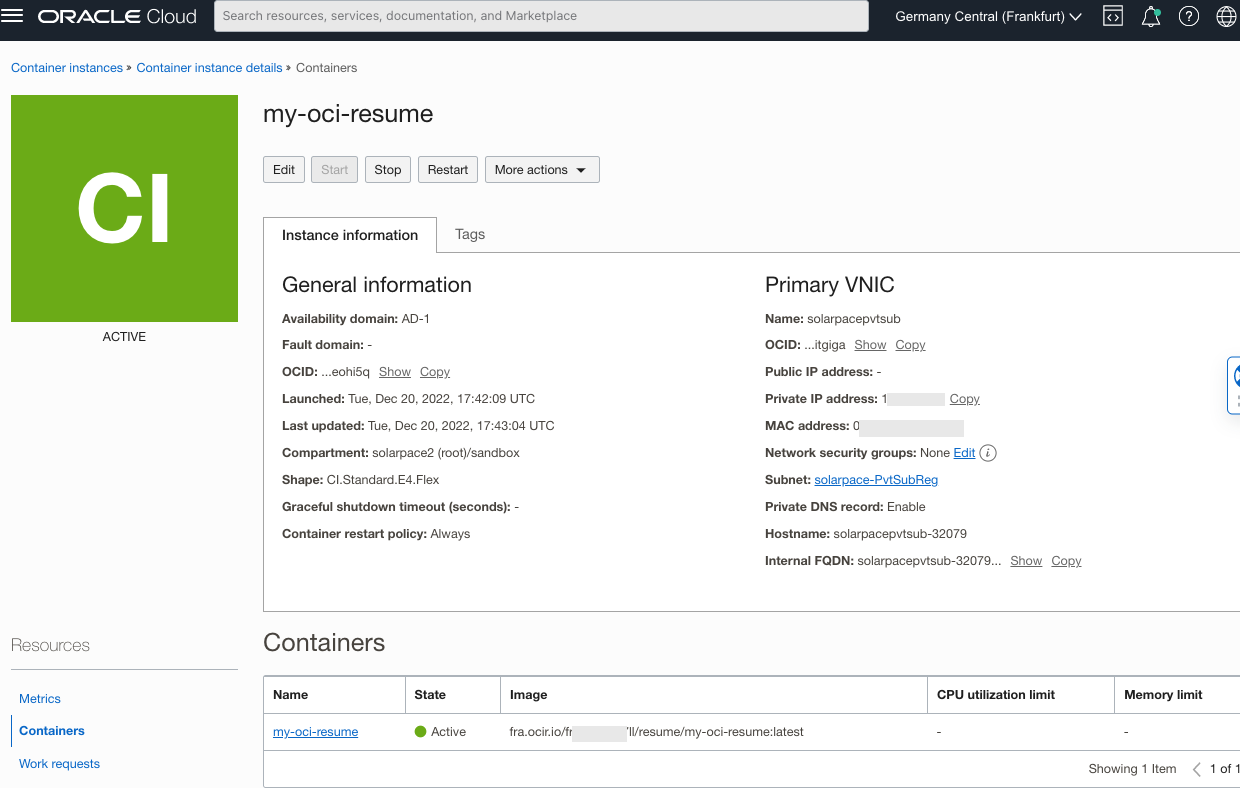
Whether you used Postman or oci-cli, after about 1 minute, you should have your Container Instance Up and Running:
Load-Balancer
Create a Load-Balancer (you can use the Free-Tiers option) in a Public Subnet and create the required resources:
OCI Certificate for your domain name; I used this Post from the A-Team Obtain a Public Certificate from Let’s Encrypt and imported it in OCI Certificate
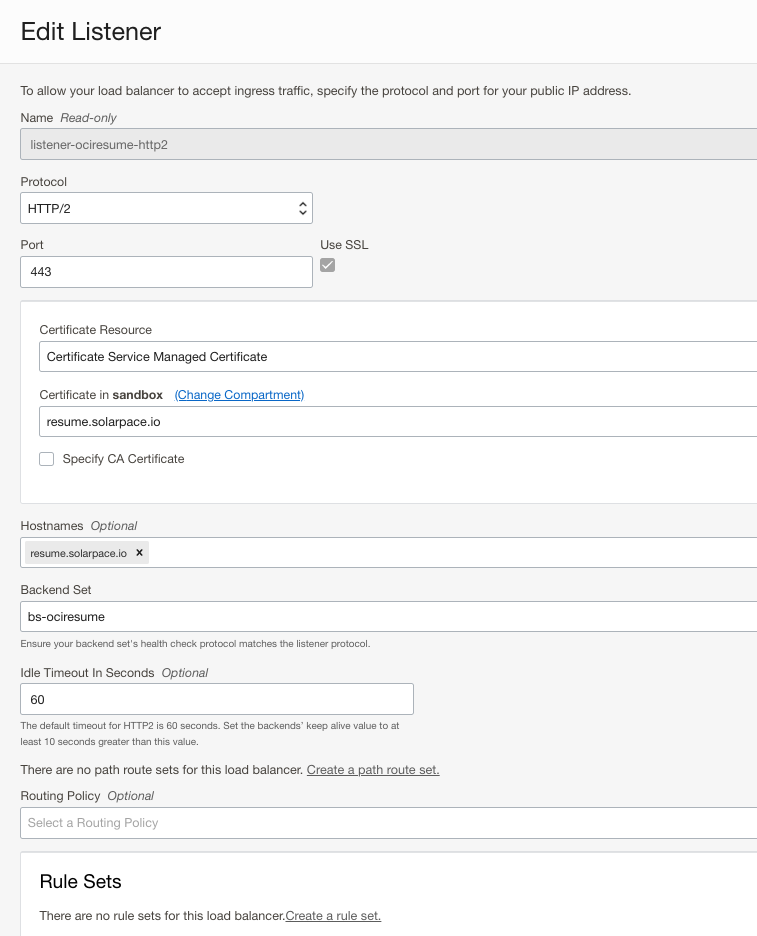
HTTP/2 listener: configured with the OCI Certificate
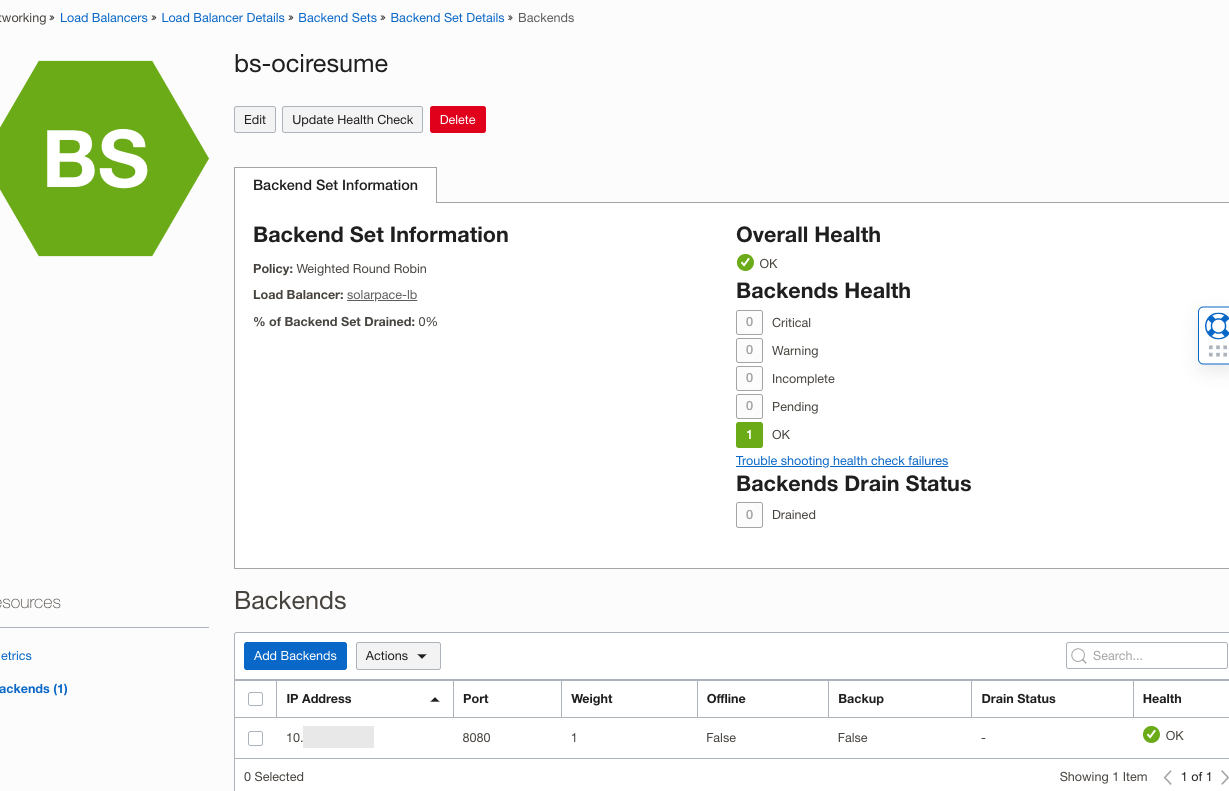
Backend Set & Backend Server: use the Container Instance IP address and Port number 8080; define the Health Check accordingly:
⚠️ Don’t forget to update the Security Lists to allow incoming 443 traffic for the Public Subnet and incoming 8080 traffic between the public and private subnets!
Deployment
My Remix application is stored in a private GitLab project; I’ll make it Public soon when I have time to refine it a bit.
Like I already mentioned I developed this application using Remix React Framework and read the articles from Kent C. Dodds to get started quickly with this framework. You could start with this post: Super Simple Start to Remix
As always, I wanted to automate as much as possible so I configured GitLab CI/CD in my project to automatically:
- build a new Container image using the Dockerfile included in my project
- push the image to my OCI repository with the Commit SHA as a Tag
- update the latest tag with this new image in my repository
- restart my OCI Container Instance so it can reload with the latest image. For this step, I use the official oci-cli image
Here is the .gitlab-ci.yml file I created:
image: docker:20.10.5
services:
- docker:dind

stages:
  - build
  - test
  - release
  - deploy

variables:
  OCI_IMAGE: $OCI_REGISTRY:$CI_COMMIT_SHORT_SHA
  OCI_RELEASE_IMAGE: $OCI_REGISTRY:latest

build:
  before_script:
    - docker login -u "$OCI_REGISTRY_USER" -p "$OCI_REGISTRY_PASSWORD" $OCI_REGISTRY
  stage: build
  script:
    - docker build -t $OCI_IMAGE .
    - docker push $OCI_IMAGE

test:
  before_script:
    - docker login -u "$OCI_REGISTRY_USER" -p "$OCI_REGISTRY_PASSWORD" $OCI_REGISTRY
  stage: test
  script:
    - docker pull $OCI_IMAGE

release:
  before_script:
    - docker login -u "$OCI_REGISTRY_USER" -p "$OCI_REGISTRY_PASSWORD" $OCI_REGISTRY
  stage: release
  script:
    - docker pull $OCI_IMAGE
    - docker tag $OCI_IMAGE $OCI_RELEASE_IMAGE
    - docker push $OCI_RELEASE_IMAGE
  only:
    - main

deploy-image:
  image:
    name: ghcr.io/oracle/oci-cli:latest
    entrypoint: [""]
  stage: deploy
  script:
    - echo "======= Deploying the project                   =========="
    - mkdir $PWD/.oci
    - echo -e $OCI_CONFIG_FILE > $PWD/.oci/config
    - chmod 400  $PWD/.oci/config
    - echo -e $OCI_API_KEY > $PWD/.oci/oci_api_key_solarpace.pem
    - chmod 400  $PWD/.oci/oci_api_key_solarpace.pem
    - echo "---> Restarting Container Instance"
    - oci container-instances container-instance restart --container-instance-id $OCI_CONTAINERINSTANCE_ID --config-file .oci/config
    - echo "======= Application successfully deployed.     =========="
You will need to define those CI/CD variables:
OCI_REGISTRY: the repository you created earlier; ex: fra.ocir.io/frdxxxxx/resume/my-oci-resume
OCI_REGISTRY_USER: your full OCI userid, starting with your OCI Namespace; ex: frxxxxxxx/oracleidentitycloudservice/gvoisin@solarpace.io
OCI_REGISTRY_PASSWORD: your OCI Auth Token
OCI_API_KEY: an OCI API Private Key used in OCI_CONFIG_FILE
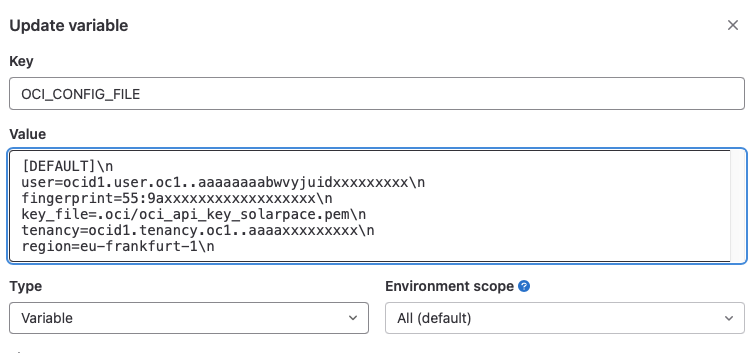
OCI_CONFIG_FILE: a config file including your tenancy ocid, OCI fingerprint, region and API Private key file:
OCI_CONTAINERINSTANCE_ID: the OCI Container Instance OCID; for ex: ocid1.computecontainerinstance.oc1.eu-frankfurt-1.antheljtujx
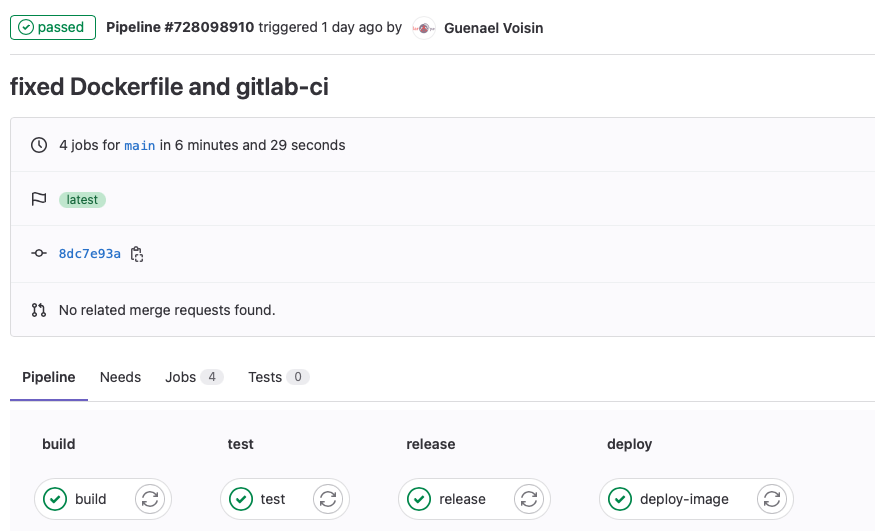
With this CI/CD configured, each time you push your changes to GitLab repository, the CI/CD pipeline will update the online application in just a few minutes:
I hope this article could be useful and give you a better understanding of the components involved. It shows how powerful OCI services could be and the kind of Web Native solutions you can build on top of it.
Do not hesitate to reach out if you need more information.
That’s all 🎉